Friday, 5. April 2013
You generally don't get to try out an entirely new framework on a consulting project, so this year's framework to play with on my time was Meteor which is a Node.js framework. There's been a lot of excitement about Node.js on the web development side the past few years (with the promise of coding in Javascript on the server and client) and one of the leading frameworks using Node.js as a base layer is Meteor (as of this writing version 0.6.0).
To truly understand a framework, it's not enough to look at documentation and examples. IMHO, you have to implement a non-trivial application that includes security and attempt to roll it out for public consumption. I decided to write an app named ChoosePix that would help with my photography hobby; in particular, the process/workflow of culling out "keepers" from a photoshoot is what I implemented.
Installation
Installation of Meteor is fairly simple. It's best to do this on a Linux machine rather than Windows (the infrastructure for Windows just isn't there yet); if you don't have access to an actual Linux machine, it's easy enough to set one up using a Virtual Machine. The tools for cloud-based hosting providers are generally on Linux as well, so it's just simpler to do everything on Linux provided you can deal with using command line tools instead of graphical Windows UIs.
Assuming you already installed Node.js and npm on your system ("sudo apt-get install nodejs npm" on Debian/Ubuntu), installation is done by simply running this command:
curl https://install.meteor.com | /bin/sh
Further updates to Meteor on your system are done using the command "meteor update", or "mrt update" if you're using Meteorite.
Meteorite is an alternative package manager for Meteor and has a lot of useful packages you'll want to use. You can install it using:
npm install -g meteorite
but instead of using "meteor" commands from now on, you'll have to use "mrt" as the command.
Then create a Meteor app with the command
mrt create <appname>
and run it by going into the newly created <appname> subdirectory and typing in "mrt". If you want to connect to your application via a web browser on another machine, you have to set the root url because it will default the OAuth callbacks to return to localhost instead of the server you're running Meteor on (192.168.1.2 in the command below):
ROOT_URL=http://192.168.1.2:3000/ mrt
Basic Concepts
There are a few basic concepts in Meteor that are critical for you to understand if you want to effectively use this framework:
- Your entire app is a single AJAX'd page (aka, SPA or Single Page App). There's a tutsplus tutorial that has a bunch of good tips on SPA considerations. "Paging" is all done on the client-side via mini-pages; this can affect some jQuery plugins that were designed to run once when your page is loaded.
- Handlebars.js is used for the web framework. With this framework, you can lay out your site via snippets/templates. This framework is also how you inject variables into the page and how you add additional functionality to your templates/snippets.
- MongoDB is used for the underlying data store. You can hook in MySQL on the back end thanks to one of Meteor's contributors named Dror. MongoDB syntax is used for all queries/updates, etc. on the server as well as the client (though a subset called "minimongo" is on the client) so you pretty much have to use MongoDB syntax for any queries.
- Part of your database is automatically replicated via publish/subscribe APIs to the client/browser; this has a lot of implementation and security implications for folks who are used to the older way of making GETs/POSTs to the server to get data to put on the web page. In addition, your database query code is also brought over to the client side because it queries data in the local minimongo database when rendering a page.
- Node.js is *extremely* callback based; people who are used to older postback frameworks will have to take some time to wrap their heads around function calls that don't block until they're done. Meteor has its own techniques to deal with this using Futures if you really want to block until a function call finishes.
- There's no user session state on the server; all state variables live on the web browser and when you refresh that page, all of it disappears.
- For debugging server-side code you can use node-inspector or console.log() calls to print out errors and dump objects w/ JSON.stringify(). Client-side, you use your web browser's Javascript debugger and console where errors will show up, so you can use breakpoints and look at objects easily there.
- All your .html files are concatenated into one file and your .js files are concatenated into another when your app is bundled/deployed (files in the public subdirectory are kept separate). All the packages' .css files are also handled similarly (this can cause package issues if the css files reference images that were relative to the original css file). Only files in the /public directory aren't handled this way.
Organization of Code
Unfortunately, the samples shown in the Meteor sample/teaser videos imply that you can should put all your code into one file and all your web page templates into another file and be done. Code in the files is then separated via conditionals on Meteor.isClient and Meteor.isServer. In practice, this is not a good way to code your application because you end up with a few huge files that you end up using your editor's search function on.
When you create an application via the "meteor create" command, it gives you the subdirectories "public", "client" and "server". Files in the "client" directory are only used by the browser. Files in "server" are only used on the server; I'd suggest putting your startup code and methods in that subdirectory rather than using Meteor.isServer to figure out if they should run on the server. The "public" directory is a good place to keep static images or jQuery plugins that aren't in Meteorite/Meteor packages. Besides these basic guidelines, I'd also suggest creating "client/dialogs" and "client/templates" subdirectories and breaking up templates/dialogs into their own paired .html/.js files. Dror also has some
guidelines for managing directories but split the other way (all .html files in one directory and all .js files in another).
Global vs. Local Variables/Functions
Even though all the Javascript files are concatenated, Meteor 0.6.0 added a way to scope variables to a .js file vs. making everything global by default. To do local variables and functions, you do this:
var myVar = null;
function myFunc() { ... }
If you want to make the variables and functions global, you use this syntax instead:
myVar = null; // no "var" prefix means this is global
myFunct = function() { ... } // no "function" prefix means this is global
Basic Debugging
As mentioned, the Javascript console on your web browser will be your new friend. For any web applications nowadays, you need to use this to debug what's going on anyways, so you should already know it. It's also common to use console.log() printouts both on the client and server; however, on the client, don't leave these print statements in your code because the "console" object doesn't exist in MSIE unless you have the console window open (unlike other browsers where it's always defined). For printing out objects on the server, you can use JSON.stringify() and you can use
node-inspector to debug after installing it with "sudo npm install -g node-inspector", then start meteor with "NODE_OPTIONS='--debug' mrt", then run /usr/local/bin/node-inspector and bring up the URL it tells you in Chrome.
Meteor Collections and Publish/Subscribe
Meteor automatically maps Meteor collections to MongoDB collections on the server side. However, the way you reference the collection is slightly different. In Meteor, you define a collection like so:
UserInfo = new Meteor.Collection("UserInfo");
This will create a MongoDB collection named UserInfo that you can query in the MongoDB shell (you get to it by typing "meteor mongo" in your application directory) by prefixing it with "db." like so:
db.UserInfo.find()
but in Meteor and in a browser Javascript console, you don't need the "db." prefix.
By default, Meteor applications are created with "autopublish" and "insecure" packages enabled. This makes the browser client have a copy of your *entire* database. This is good for prototyping since you can make changes to the database from the browser's Javascript console, but you definitely want to remove these packages before publishing. The rest of this section assumes you've removed these packages.
To get the data to the client side, you have to "publish" it. This basically sets up rules to publish the subset of a MongoDB collection to the client/browser's minimongo database. You can generally follow this pattern of writing a single Javascript function and then using it in the publish (on the server) and subscribe (on client) code:
getMyDocs = function(filter) {
var userid = (Meteor.isClient) ? Meteor.userId() : this.userId;
return Documents.find({ user_id: userid, size: {$gte: filter} },
{fields: {title:1, description: 1, modified: 1}} );
}
Then you publish and subscribe to the information
if (Meteor.isClient) {
Deps.autorun(function () {
Meteor.subscribe("myDocs", Session.get("filter"));
}
if (Meteor.isServer) {
Meteor.publish("myDocs", getMyDocs);
}
Note that the subscribe function uses "Session.get()" to pass in a parameter to this function. This isn't a normal "session" that most web developers work with because it lives only on the client; in a normal web server, "session state" is kept on the server.
It's always wise to check that users have access to the documents in your publish function. It's also wise to limit the fields that go over to the client to minimize the amount of data that needs to be pushed over before the page can be displayed.
When your pages are finally displayed, it's also a good idea to bring up the Javascript console and see what data is being brought over for that template by doing "Documents.find().fetch()". If you're not following the guidelines above, you'll be surprised how much data actually made it over.
Server Polling
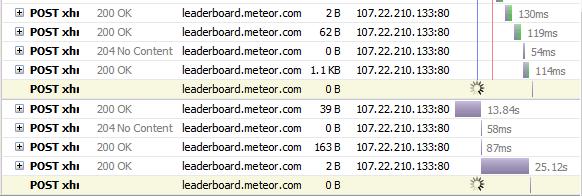
One of the main features of Meteor sites is "live realtime data" which is synchronized between all clients connected to an application; if one client changes the collection, the change will be pushed to all other clients looking at that subset of data. For the data to be synchronized with the client, a polling mechanism is used to find out whether there is new data. Polling frequency is roughly every 25 seconds as you can see from this browser traffic:
 Latency Compensation
One feature of Meteor I wasn't too comfortable with is what's called "latency compensation". Since the data is on the server and client, what this does is let users modify the local client/browser minimongo database which then pushes the change over to the server. To prevent clients from doing whatever they want, Meteor provides an
allow syntax for collections which allows rules to be checked on any data changes coming back from the client. There's also a deny syntax on the same insert/update/delete operations on a collection.
In lieue of that, I used a Meteor.method call to make database updates which then percolate back down to the client. This is more secure because all changes have to be done server-side, but laggy in comparison. I had to use Meteor.method calls because I wanted to limit access to a subarray in my documents; the allow functionality is on a document basis, not parts of the documents.
MongoDB Hierarchical Data
If this is your first experience with a NoSQL database and you normally use an RDBMS, you'll find that it's hard to get used to denormalized data. I had Lotus Notes (one of the origins of NoSQL) experience before this, so it's not that far a stretch to MongoDB except for the unusual syntax. RDBMS fundamental design almost always includes normalizing all your data and using foreign keys to link tables together...a NoSQL database is almost the opposite.
With a NoSQL database, and MongoDB's in particular, you should be thinking in terms of "documents"...i.e., what users manipulate on the web pages. For a news story, the information about authors would be duplicated in each story (as well as another collection named Authors, most likely); the user comments on the story would also be included in a subarray of the story. This is done so that when you retrieve a story for display on the web site, one call will grab all the info needed for the story. If you insist on trying to denormalize your data, you can use the
Publish With Relations package in Meteorite to merge the data being published when it's sent to the web page for display.
When working with document subarrays, you have to use several MongoDB functions to query and manipulate the subarrays. You use the $push function to add new items to the subarray and the $pull function to remove items from the subarray. The other important function is $elemMatch; this is critical in matching documents with specific subarray elements like this:
Stories.find({ comments: {$elemMatch: {commenter: 'Joe'}} });
which will find all stories with a comment by "Joe". You can then limit down the results sent down to the client by using the same function with the fields option to send only comments by Joe down:
Stories.find({ comments: {$elemMatch: {commenter: 'Joe'}} },
{fields: comments: {$elemMatch: {commenter: 'Joe'}} });
Templates
The .html templating system is based on
HandleBars.js so it has all the features and weaknesses of HandleBars. Handlebars is intended to be a very simple client-side templating system that can be easily extended. Because it's meant to be simple, it's missing date formatting which I'd consider an essential part of a templating system; internationalization is also missing but you could argue that date formatting should be part of internationalization. Adding date formatting is fairly easy by adding a helper:
// format an ISO date using Moment.js
// http://momentjs.com/
// moment syntax example: moment(Date("2011-07-18T15:50:52")).format("MMMM YYYY")
// usage: {{dateFormat creation_date format="MMMM YYYY"}}
Handlebars.registerHelper('dateFormat', function(context, block) {
if (window.moment) {
var f = block.hash.format || "MMM DD, YYYY hh:mm:ss A";
return moment(context).format(f); //had to remove Date(context)
} else {
return context; // moment plugin not available. return data as is.
}
});
Templates can be nested inside other templates so you can refactor templates that show up on multiple other templates:
<template name="template1">
{{> template2}}
</template
You'll generally end up with this design pattern for the Javascript handling code for each template:
Template.mytemplate.events = ({
'click .someclass' : function(event.template) { ... return false; }
});
Template.mytemplate.helpers({
somevariable : function() { ... return xxx; }
});
Template.mytemplate.rendered = function() {
};
The events() are where you declare the form handling for your "page". Be sure to include "return false" if you're handling the click event on a button or the click will actually go through to the button and your page will mysteriously refresh. Note also that a jQuery selector is used for the second part of the specifier; this means that if you have two buttons with the class "someclass" on them, the event will be assigned to both of them (this is usually used for the cancel event of a dialog).
The .rendered function is where you'd put the normal Javascript initialization for a regular HTML web page. Be aware that this callback gets invoked whenever new data is loaded down to the Meteor "page" so some jQuery plugin initialization may have to be rewritten to handle this.
The helpers() are where you declare variables you want to use on the templates. E.g., in the example above, if you put "{{somevariable}}" on your template, the returned string from that function will be placed on the template. The alternative to helpers is defining the variables like this:
Template.mytemplate.somevariable = function() { ... }
but if you do this, be sure not to do this:
Template.mytemplate.somevariable = somefunction();
In some cases, you'll want to avoid being refreshing parts of your template. The most typical case for this is a dropdown list which would reset back to the first element if you let it refresh. You can do this by using "{{#constant}}" markup on the template:
{{#constant}}
<select class="mysel span3">
<option value="">First Value</option>
{{#each raters}}
<option value="{{val}}">{{description}}</option>
{{/each}}
</select>
{{/constant}}
There are other tips on the
Meteor Handlebars Wiki.
Sending EMail
Sending email notifications is an important part of any web application and that's easy to do with Meteor's authenticationed SMTP client support. You can use
MailGun (default) or
Gmail as the servers to send mail through. Once you've configured which server to send email through, sending it is a fairly simple function call:
Email.send({
from: fromEmail,
to: toEmail,
replyTo: fromEmail || undefined,
subject: from.username + " sent you this email !",
text: "Hello " + to.username + ",\n\n" + msg +
"Thank you for using our site!\n\n" +
Meteor.absoluteUrl()+"\n";
});
Authentication
Authentication is one of the strong features of Meteor. It has an easy to use system that lets you add users using its own database (accounts-password), Facebook (accounts-facebook), or Google (accounts-google) or Twitter (accounts-twitter). Quite a few other oauth providers have also been written by contributors which you can find in the
Atmosphere repository. Adding a base UI for this is done by adding accounts-ui. Once you do that, you just need to add
{{ loginButtons }}
wherever you want the login/logout UI to show up in your template.
The accounts-ui unfortunately cannot be restyled yet so that's the main weakness of this pre-packaged system; you have to copy all the files from the accounts-ui package and create your own package to restyle it. In addition, the OAuth access token can be accessed with "user.services['<service'].accessToken" but there's no API to automatically refresh it so you have to do it yourself if you need to access the OAuth provider's other APIs (e.g., Google or Facebook APIs); once a user logs into Meteor with an OAuth provider, an internal Meteor token is used to log back in instead of that OAuth token.
For the case where you want to display sections of templates depending on whether the user is logged in, you can do
{{#if currentUser}}
...
{{/if}
However, since Meteor is reactive, when you first hit a page, the currentUser object may not exist yet even if the user is logged in. So if you're just depending on currentUser to figure out whether to show a logged-in template vs. non-logged-in one, the page will flash the non-logged-in template temporarily because a Meteor page has 3 states: not logged in, logging in (currentUser object hasn't been sent down to the client yet), and logged in. To handle the middle state, you have to follow the pattern on the mini-pages site and create a separate "loggingIn" template:
function loggingIn () {
if (Meteor.loggingIn()) {
this.template("loggingIn");
this.done();
}
}
Meteor.pages({
'/posts/:_id': { to: "postShow", before: [loggingIn] }
});
Security
Before releasing your application to the world, these are a few things to check:
- have you removed the Meteor "autopublish" (pushes the entire database to the clients) and "insecure" (lets you modify the database using the browser Javascript console) packages?
- have you checked what happens when you hit all your urls when the user isn't logged in?
- have you looked at all your collections on the client/browser to see that only the minimal data needed to show the page is there for each type of user?
- are you checking user permissions as well as object permissions in your Meteor.methods?
Deployment
The safest and easiest way to deploy Meteor apps is to Meteor.com's infrastructure. You can do this by executing the command
mrt (or meteor if you're not using Meteorite) deploy -P yourapp.meteor.com
The -P is important because it puts a password on it the first time you use it to keep others from overwriting your site; you don't need that flag the next times you deploy because it'll prompt you for a password. You can also use the -debug flag if you want to prevent the bundler from merging all your .js/.css files and minifying them so you can debug your application more easily.
If you want to put it on your own domain, you can deploy with "mrt deploy -P www.yourdomain.com" and then in your DNS hosting company, you forward yourdomain.com to www.yourdomain.com (in GoDaddy's UI, you do this in the Domain Manager in the Forward\ForwardDomain menu; note that this will also change your domain's A record to GoDaddy's forwarding server's IP...do *not* change this value). For your DNS records, you then point your "www" hostname to origin.meteor.com (in GoDaddy's setup, "www" defaults to "@" and "@" can be filled with any IP since it's being forwarded from the previous step). The setup is a bit unusual, but it works if you follow these steps.
There are examples of installing Meteor application on different Cloud hosting providers including
CloudBees,
Heroku,
PogoApp, and
OpenShift. I tried OpenShift because I like their support of JBoss, but was unfortunately unable to get it working even with their help (the site complained it couldn't find the Email package and the ROOT_URL variable wasn't set properly so the http prefix was missing). Meteor is relatively new and is undergoing rapid changes, so you'll have compatibility issues with different versions of Node.js supported by hosting providers.
Some folks have been able to bundle
Meteor applications via PhoneGap for mobile devices but I haven't tried it yet. I'll update this when I do.
It's currently not easy to scale hosted Meteor sites on the web side because DDP connections have to be sticky (though this can be done w/
AWS w/ ELB if you set things up yourself); on the database side, you can, however, use a replicated sharded MongoDB setup. Scaling the web side will be done before 1.0 is released.
Community/Ecosystem
I found the Meteor development community to be stronger than I expected for such a relatively new framework. The Meteor developers frequently reply to people in the
Meteor Google Group and Meteor users are also very helpful. There has been a lot of Meteorite package contributions including additional authentication methods and mini-pages and MySQL support and packaging a new feature is very straightforward (enough that I packaged jquery-easing and pirobox). There are a lot of examples with code on github and there are a lot of quickstart samples you can get a jump on. Documentataion is also excellent for such a new framework.
Issues
- Custom Bootstrap CSS themes will break Responsive CSS (the feature of Bootstrap that lets it resize parts of the page automatically when working with different sized screens for phones, tablets, desktops, etc.)
- OAuth2 access tokens aren't automatically refreshed; this has to be done manually and you have to update accessTokens in the users table yourself (see Meteor github issue 522)
- The .rendered callback for a template gets called a lot if you have a lot of documents get updated from a database on the page; it's not called once when the page is rendered. If your jQuery calls in the .rendered callback do a lot of processing, this can slow page rendering down enough to cause the browser to complain that a script is taking too long. This can also cause a lot of page flickering as parts of the page rerenders.
- Sometimes, the reactivity is a mystery (e.g., not sure why opening a dialog box would cause the entire page to refresh instead of just activating the dialog box).
- You couldn't access the user ID when hooking into the onCreateUser event (fixed in 0.5.8) so you could add the user ID to a different document.
- To support "pages", you have to use the mini-pages package, but that then uses Page.js which uses the HTML5 pushState API which isn't supported in all browsers (notably MSIE7-9 as well as IceWeasel on Debian) (fixed in mini-pages 0.3.1).
- Other common mistakes:
https://dweldon.silvrback.com/common-mistakes
Conclusion
Once I got over the initial hump of understanding how Meteor (and MongoDB since it's an intrinsic part of the environment) works, I found it fairly simple to code with. The large number of Node.js npm packages helped a lot in getting a functional site running. Meteor seems to be a nice tool to put together the new Web 3.0 (interactive shared live data) social apps quickly. It's relatively stable now, but has changed APIs in the short month or two I've used it, and the web side can't scale, so it's not quite ready for production use. It's definitely an interesting framework to prototype with...
 Ken's Blog
 Entering the Atmosphere with Meteor.js04/05/2013


 I did try it on my Linux machine and when I stick the URL from node-inspector into a browser, I just get a blank page. So it does look like the printing method is the most reliable...


 -
-